4 Shared values
All these values exist in most Modules, as an example we are working on the Base Module here but it all applies exactly the same to the Edge and Distortion Modules.
Before we start;
Let's assume our Main Shape Texture is just a white fill.
This will make things easier to grasp.
AND our;
Lifetime = 1f;
LifetimeMode = Per Vertex
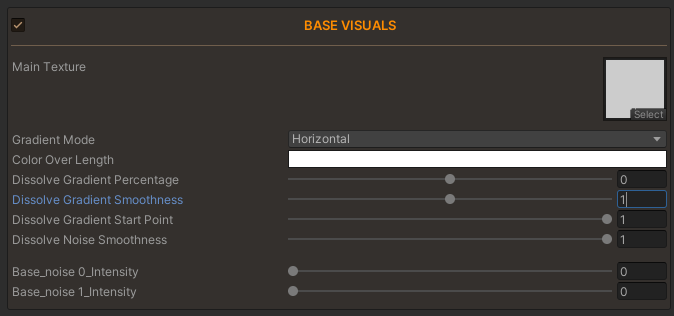
Gradient Percentage
This is the main control of how much lifetime we want on this module.
If the Gradient Percentage is close to 1, the vertices will be looking
like they are almost at the end of their lifetime even when they were just born.
Example; Gradient Percentage = 0.6
If the lifetime is 1 and Gradient Percentage is 0.6f;
all vertices will go transparent after 0.4 seconds.
Example; Gradient Percentage = 0.2
If the lifetime is 1 and Gradient Percentage is 0.2f;
all vertices will go transparent after 0.8 seconds.
So why can the Gradient Percentage go below 0?
Yes, the default values should be between 0 and 1.
We will now see the merit in breaking those rules as soon as we get to the Gradient Smoothness part.
Gradient Smoothness
This controls how smooth the dissolve gradient is.
So basically the
-
Gradient Percentage
-
Gradient Smoothness
come together to create the main gradient that will be multiplied by the shape texture.
This gives us very good control over the shape but also the noises that will be added in the Noise Module
High Smoothness
percentage = 0f smoothness = 1f
Low Smoothness
percentage = 0f smoothness = 0.2f
So why can the Gradient Smoothness go above 1?
Yes, again; the default values should be between 0 and 1.
Lets explain both Percentage and Smoothness being able to break the rules.
See that the extreme values give much more control over the gradient that didn't exist before.
During Art Directing the trails; these extra alternatives give us so much freedom
Gradient Start Point
Technically;
This lets you multiply the Gradient right before the noise calculations.
Mental Model;
Imagine you can offset your lifetime with this number, bringing it lower pushes the segment further in it's lifetime.
If we had 1 second lifetime and Start Point is 0.6f, segment roughly starts out looking like it's already "0.4f years old" as soon as it was born.
Hence the name.
Default value is 1(it doesn't affect the trail)
(So far we have worked on a white fill texture so this sounds absolutely meaningless. And when you play with it now with the white fill, you'll find that it just makes it a bit more transparent.)
We didn't learn noises yet, but for now I'll put a noise on the trail to showcase what this value is for.
Example; Start Point = 1f
In this example the startPoint is 1, meaning it has absolutely no effect on anything at the moment.
this video is here so we see the difference on the next example.
Example; Start Point = 0.35f
Realize that now we have much less of the shape showing;
And as a result: Revealing the Noise behind it
Never put this value too close to 0; the trail will just be transparent.
Pro Tip
Assume this value HAS TO stay 1 until you deal with everything else. Use this as a "last touches" kind of value.
Noise Smoothness
This lets you Smoothstep the combination of all of the above(also noises combined as well). It also is a Noise focused value that makes much more sense once you have noises set up.
This is the thing that lets you get either;
- Stylized
- Realistic
- Anime
trails.
Example; Noise Smoothness = 1f
This again is a default example to let us compare with the below example.
Noise Smoothness is 1 here; it is the baseline.
Example; Noise Smoothness = 0.5f
Let's try full sharpness;
as you can see, this is dissolving fully sharply through the noise texture.